Dennis Liggett — Notes from Demonstration:
1.I cut pieces 2.5 X 2.5 X 4.25.I use wood that will be light and give a good contrast to the stone color that I will be using.I rough these pieces to round and create a tenon to be used for mounting.
2.Mount the piece in a 4 Jaw chuck and clean up if it is not running true.I mark the tool rest to show the ends of the lines of the story stick attached.I take the end position of the largest part of the tree and size it to 2”.
3.I then taper from the 2” point to the open end.I cut the small end off with a skew and use the skew point to create a very tiny center for the drill bit to run in.I then drill the end with a #58 drill bit which I find works for my eyelet hangers.
4.I place the story stick at the end and mark the location of the 4 branches. I mark an additional line approximately 3/16” to the left of each branch line.I do this because I use a lot of aspen which is white and light but very prone to tear out.I use a small parting tool to cut at the additional line.
5.With a spindle gouge I cut the branch upswing part of the branch, after all are cut I go back and cut the back side of the branch.This sequence is used to give me access to the underneath side of the branch.
6.With a parting tool I reduce the part under the bottom branch to the size of the base that I want.(approximately ¾”)I then finish cutting the bottom branch with the skew.
7.I stop the lathe at this point to check for the quality of the cuts.With aspen you can have a lot of tear out.I clean up the cuts as needed.
8.With a parting tool I reduce the stand area of the tree to approximately 3/8” and clean up the underside of the branch with a skew.
9.I then shape the bottom of the base and sand everything to 240 grit and then part off.
10.After batching these into approximately batches of 20, I put a 3” sander in the chuck and sand the bottoms of the ornament.
11. I insert the eyelet for the hanger. I do this by putting thick super glue on the end of the eyelet and inserting it into the drilled hole.
12.I then spray the tree with a sealer.I do this to prevent dust from the crushed stone getting into the fine pores of the wood.
13. I then run a small bead of medium super glue around the edge of the branches. I use a plastic marker with a notch cut to spread the glue. Spread the glue gently and do not try to wipe it off. If you spread is too thin, the stone may not be able to stick. This step gives a very even appearance to the material.
14.I then take a salt shaker that has been drilled out to 5/32 for the holes, that is filled with crushed stone and I sprinkle the stone onto the tree.
15. I then spray the tree ornament with 2 coats of a high gloss lacquer.
Project #2: Mini-Roman Canteen with side Inserts and a Silicone Stopper
Multi-Axis Turning Made Easy
Materials White Oak
8/4” x 4-1/2” x 7”
(2) 3” diameter disc x ½” thick
1-1/2” x 1-1/2” x 2-1/2”
Procedure:
1 Locate and mark the centers on each end and one face of a 8/4” x 4-1/2” x 7” block. Accuracy is key here.
2 Drill a 2″ hole in the marked face for an entry and chucking point.
3 Mount the block by expanding the chuck into the 2″ hole. I use a piece of masonite spacer to keep the wood out away from the chuck. This is so that the jaws on the interior of the 2″ hole are not too deep. This would interfere with the turning tool inside the canteen body. Face off the wood on the exposed side.
4 Mark a series of concentric circles around the 2″ opening approximately 1/8” apart, from the 2″ hole to the edge.
5 Remove from the chuck and mount between centers lengthwise.
6 Using a gouge to cut along the edge, crown the edge shape.
7 Round off each end down to the largest diameter circle drawn on the face.
8 Turn down the ends to 1-1/2” to 1-3/4” diameter rounds
9 Turn a tenon on one end to fit the jaws of a scroll chuck. This will be the bottom of the canteen.
10 Create a ¼” to 3/8” bead at each end of the canteen. I make the neck one smaller in diameter than the bottom.
11 Sand the edges of the canteen and the beads.
12 Remove from the centers and mount the bottom tenon into a scroll chuck
13 Mount a drill chuck with 11/16″ drill bit into tailstock and drill a 2” deep hole into the neck of canteen.
14 Part-off the waste beyond the bead on neck of canteen while using the cone center for support. Do the finish sanding to the beads and the canteen edge.
15 Part-off the waste below the bead on bottom of canteen with slight undercut.
16 Mount the canteen in the scroll chuck using the 2″ hole on one side. Place the masonite spacer between the chuck and the canteen.
17 Face off the side of the canteen. With a crooked hollowing tool, hollow out 1/2 of the inside of the canteen. Finish sanding the side of the canteen.
18 Reverse the canteen to the other side still using the masonite spacer. Hollow out the other 1/2 of the inside of the canteen. Finish sanding the other side of the canteen.
19 Remove the canteen and mount 1-1/2 x 1-1/2 x 2-1/2 block (Top) in the chuck.
20 Turn down the 1-1/2 length to about 1/2″. Place the silicone stopper on the 1/2″ tenon and check it against the canteen for fit. The reason for this step is that the silicone of the stopper can stretch and not fit the hole in the top of the canteen. Modify the thickness of the tenon to get the silicone insert to fit. .
21 Remove the silicone stopper after fitting and reverse the top to finish the knob for removing the stopper.
22 Mount a 1/2″ thick piece between centers and true up to about 2-1/2″ diameter. Take 1/4″ down to the 2″ for the opening.
23 Mount the insert using the 2″ diameter portion in the chuck. And turn the surface to the desired design. finish sanding the insert.
24 Repeat 22 and 23 for the other insert.
25 Glue the inserts into the canteen using epoxy.
26 Finish with the finish of your choice.
Project 3
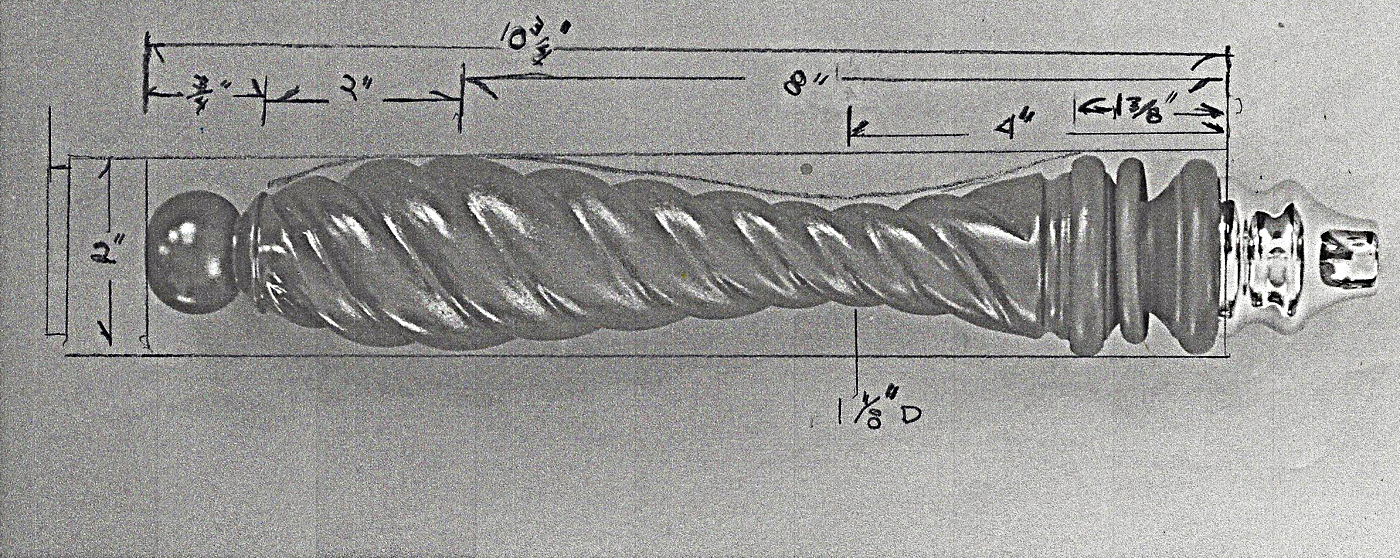
BEER TAP HANDLE with a 4-start graduated twist
This project allows you to create a twist that cannot be made by machine. Although the legacy and other mechanical systems can make a 4-start twist, they cannot fit the twist onto a shapely form as well as a turner can.
The beer tap handle is a hand-crafted product that appeals to folks who love craft beers, or make their own.
Select a ferrule and hanger bolt for your handle: You will need to have the hardware to measure the size of the wood screw end of the hardware for drilling the hole in the wood.
Prepare your wood blank: I use a 2.5 x 2.5 x 12” blank for this handle. Make a tenon on one end and mount in a chuck. Rough the blank down to round, and true up the end at the tailstock so that the hardware will mount snugly.
Insert the hardware: Drill the hole for the wood screw end of the hanger bolt slightly smaller than it measures. To do this, insert the machine screw end into a hand drill, lock the lathe, and screw the other end into the wood with the drill. The wood screw portion needs to go all the way into the blank. Now screw the ferrule portion onto the machine screw, and make certain that at least ½” of thread is open to attach the ferrule to the tap. If you cannot measure a full ½”, then the handle will be too loose when the new owner attaches it.
Turn the initial shape: Bring the tailstock up to the ferrule, using a tapered live center to avoid damage to the ferrule’s finish or better yet remove the ferrule and put the live center in the drilled hole. Mark the sections of the handle, and turn to the outside shape. If you are making a captive ring, do that section first, nearest the ferrule.
Captive Ring: I use the captive ring tool to cut it. A small spindle gouge may help to clean up the cove after cutting through the ring. This bead portion needs to be sanded just before the final separating cut, since the moving ring is difficult to sand. If you choose not to make the captive ring, a nice cove is still good at the base of any twistwork.
Marking Out the Twist: This is the process of drawing a grid on a 3-dimensional object. It is a skill that also works for decorating hollow forms, and, surprisingly, requires almost no mathematics! It does, however, benefit from a sanded surface that doesn’t snag the pencil…
Horizontal lines parallel to the bedways: Gliding the pencil along the tool rest will get you a straight line that follows the contours of the handle. To divide into four sections, start at a corner of the chuck jaws at the headstock end and glide the pencil toward the tailstock. Use the same corner of all four jaws, and you will have made the lines that make this a 4-start twist. Number each of the first four lines at the tailstock ends. The next step is to divide each of the 4 horizontal sections in half by eye to make 8 lines.
Lines around the form: The spacing of these guidelines determines the variation in the spacing of the ‘bines’ or beads. Measurement of the diameter of the cylinder is the critical step. A rule in twistwork is that ‘All twistwork is a function of the diameter(s).’ In practice, a simple caliper provides an easy way to measure the distance between the lines around the form. Make a first line at the narrowest part of the cove. Start with the smallest diameter, set the caliper. Use the caliper to find the location for lines on either side and draw a vertical line by rotating the form slowly by hand.
Now, reset the caliper for the diameter of the new vertical line where the form is getting bigger, measure the gap to the next line, and draw it. Keep going in this way until you have marked out the entire area that you want to twist.
Add more guidelines by dividing distances between these lines by eye, just as you did for the parallel lines. These lines are just to give you an easier time in drawing diagonal lines. For this twist I divide the distance between vertical line once and then I divide the remaining sections again. This should give you 4 equal sections to you original vertical segments. When you are done, you will have something like stretchy graph paper over the surface of the form.
Creating the lines for the top of the bines: Starting with the numbered marks on the original 4 parallel lines, make diagonal marks across all of the graph squares going up to the headstock end. Do this for all 4 numbered lines. Check to see that the 4 lines travel in parallel up and around the form.
Creating the cutting lines: These will be the coves between the tops of the bines on the twists. Start between the 4 numbered lines of the bines, and use a different color of pencil to create the diagonal marks across all of the graph squares. The cutting lines should be half way between the lines for the tops of the bines. When you look at the markings, you will be able to see how the bines are bigger at the bigger diameters, and smaller at the smaller diameters of the form. This is the ‘graduated’ part of the twist design.
If your graphing is too uneven, or if you made a big mistake, sand down the form and start over until you like what you see for the twist.
Cutting the coves between the bines: to start the cut, a longer tool like a file or a small microplane (stiffened with a dowel) will eliminate the little bumps between the graphing squares. As you saw gently with the file or microplane, slowly rotate the piece with your other hand, so that you are following the cove lines all the way from the tailstock to the headstock.
The ends of the coves are important: Be mindful of the starting and ending strokes so that your coves stay rounded and even at both ends. It is easy to cut too far, or too deeply if you push too hard on the tool.
Using a power tool: A power carver tool can speed up getting the coves deep enough. Some reciprocating carvers may work, as well as smaller carvers like the Proxxon or Merlin. I use a rough burr for the first cuts and shaping, and a smoother one for cleaning up. I use the Stuart Mortimer designed cutters sold by Treeline and used on Proxxon, Merlin, or Mini-Arbotech.
The key to success with the power tool is to keep your rotation of the piece (by the other hand) steady, and maintain the correct angle of the cutter so that it smoothly follows up the cutting line.
You can continue to cut with a big round bastard file or a microplane if you do not have a power carver.
How deep should you cut the coves? Probably deeper where the bines are bigger, and shallower in the narrow waist of the handle. All twistwork weakens the form, so don’t get carried away by the ease of cutting with a power carver!
Shaping the curve of the bines: Each bine is now standing proud of the coves on either side, but it has corners on both sides. Using a file, microplane, or power carver, you now need to change the angle of the tool to knock down the corners. Again, developing a smooth motion and a steady rotation will help you shape the bines with the fewest nicks and divots.
Refining the shape of the coves and bines: In twistwork, sandpaper is a shaping tool. Using a sanding stick with a rounded side slightly smaller than your cove, wrap 80 grit around it and repeat the motion of moving along the coves from tailstock to headstock as you rotate the piece. Then change the angle of the stick, and continue to round the bines. Keep going with 80 grit until there is a smooth transition from cove to bine and the bottom of the cove is smooth. When the shape is right, start working through the grits in the same way. It will take much less sanding as you approach 220 grit. At this point, apply a wipe-on polyurethane, let it penetrate, and dry. Then continue sanding with 320, apply wipe-on polyurethane, let it dry and continue until you are satisfied with the finish. You can remount the piece using the tenon made for the ferrule to have the lathe hold the piece.
Finish: This handle needs to stay sealed, so I use wipe-on polyurethane for a finish that can be wiped clean with the least damage.
Parting off the handle: I use a spindle gouge or skew to shape a ball at the top of the handle. At a slower speed, I gently make the parting cut with a parting tool. If the top remains uneven, I hand sand the last bit.